Diligent hardband management protects drillstrings, reduces repair costs
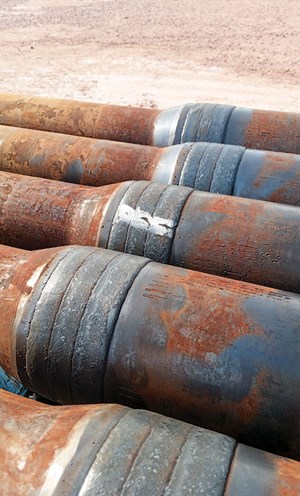
I recently asked a friend, who manages a hardbanding company, what he saw as the most common problem in cases of hardband rejection or failure. He wasted no time in responding that the common denominator is poor application. This was not the response that I expected from a fellow hardbander, as he should know that we are constantly asked to perform miracles, where production numbers and viability of reapplication are concerned. Modern hardbanding alloys are the culmination of years of R&D by some of the leading minds in metallurgic science. They are literally new metals created to a single purpose and, as such, it is incumbent on applicators that they follow the developers’ specifications for initial and reapplication, Fig. 1.
KNOW YOUR APPLICATOR
The industry’s demand for repeatability has increased reliance on automation which, in turn, reduced the necessity of comprehensive training for operators. More and more, we are seeing hardband operators who, while capable of running their particular machine, have not been trained as to why certain parameters are in place or how these specifications work to avoid damaging pipe.
Frequently, we encounter individual operators who are not given access to specification manuals, have not been trained on pre-weld reject and acceptance criteria, and do not know who to call to get the information. On the other side, competent operators are too often instructed to just “do the best they can” when, by their own experience, they know the end result will be substandard. There are more than enough adequate, and some exceptionally talented, hardbanders working today. But like any other field, there are some for whom quality is not their top priority. Therefore, it is critically important that drillers and operators know their applicator and keep track of who is servicing their pipe.
ACCOUNTABILITY
In the U.S. domestic market, there is a serious lack of accountability and traceability, where hardbanding is concerned. An inspection company would certainly not expect to be able to collect payment for a job without submitting an inspection report, yet U.S. hardbanding companies do so constantly. Not all domestic companies are negligent in this regard, and not all international interests are requiring reports. Yet, there is a substantial difference in the attention given to traceability with international projects when compared to what we see in the U.S.
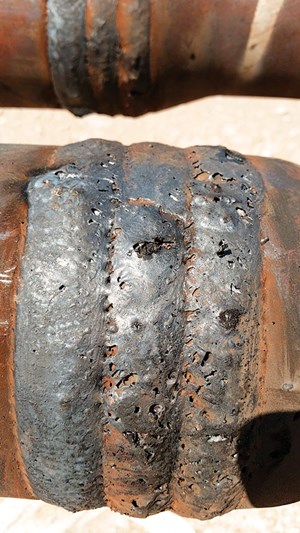
Earlier this year, we were called out to location by an operator, who specifies one of our hardbanding wires. The firm was having pipe inspected and hardbanded during a rig move, and had found severe cracking and porosity, as well as flaking in some of the hardbands, Fig. 2. We employed an XRF survey to ascertain the basic composition of the material, which enabled the determination that neither the damaged hardbands, nor the bulk of the good hardbands, were our products.
As both the drilling and operating companies have specified our product for some time, they began trying to determine what product was on their pipe, who had put it there, and why. Unfortunately, they had awarded the last three hardbanding jobs to three different companies, none of which had been required to submit any documentation for the work performed other than an invoice. Thus, neither the asset owner nor the operating company had the means to attempt a claim on the repair bill. It is past time that the U.S. domestic market catches up with the rest of the world. End-users and asset owners, be they drilling, operating or rental companies, should be requiring hardbanding reports.
A thorough accounting of the work completed should include:
- The name of the company, name of the individual machine operator, and the unit number performing the work.
- The brand and type of product being applied, as well as the lot numbers found on each roll of wire.
- Serial number of each pipe being hardbanded.
- Preheat and interpass temperatures for each joint.
- Before-and-after OD measurements for each joint, and width measurements of the new hardband.
- All mechanical and electrical parameters employed during the application.
- Reports also should include observations of the condition of existing and reapplied hardbands.
Defects in hardbanding tend to accumulate with repeated applications. Work-induced micro-cracking can show as mild porosity after reapplication. Add another round, and suddenly there are cracks linking the porosity. Once or twice more, and the hardband begins to fall off, and the asset owner is looking for someone to blame. Without documentation to support traceability, liability for the repairs will be tossed around like a hot potato.
On the other side of the coin, keeping detailed records can indemnify applicators in cases where more than one company has worked on the same string. Additionally, such reports contribute to overall traceability of the drill string and provide an excellent framework for tracking hardband wear. With the myriad of technical and quality issues that can arise throughout the service life of a drill string, it would seem like common sense to keep detailed records of any work performed on the pipe, yet very few hardbanding companies offer comprehensive reports. Even fewer end-users require them to be submitted. Maybe it’s time they should.
PRE-WELD INSPECTIONS/COMMON AVOIDABLE ISSUES
Prior to attempting reapplication, at the absolute minimum, the existing hardbands need to be inspected visually by someone versed in the wire manufacturer’s acceptance and rejection criteria. Pipe inspection does not dwell heavily on hardbanding, so it is important to verify that the personnel performing the inspection know what they are looking for. The best way to avoid a costly repair bill is to invest in preventative maintenance. Nothing prevents unacceptable hardbands as effectively as a third-party inspector sitting over the applicator’s shoulder.
Hardbanding operators can feel pressure from their employers to run fast or cut corners in the form of a daily quota. They may be pressured to stretch acceptance criteria at the rig site by a customer, who would rather roll the dice on rehardbanding rejects than pay for removal and repair. It could just be his first day on the job. Having a third party, who is trained in monitoring hardbanding jobs, ensures that parameters are adhered to, and every joint gets a thorough look. Additionally, most wire manufacturers have field service staff, who will perform on-site audits at the end user’s request. While the added cost of employing third-party personnel is certainly a consideration, it pales in comparison to the cost of repairing a string as a result of bad work.
One of the most common issues that we encounter is situations where inspectors and hardband applicators misidentify “inlaid” hardbands as reapplication candidates. Inlaid, or “flush” hardbanding, is when a groove is machined into the tool joint, and the hardbanding is then applied to match the OD of the tool. This practice has become common for slim-hole applications.
The problem with unidentified inlays goes back to fundamental welding principals, namely weld adhesion to the parent material. Inlaid hardband is typically applied to a depth of 3/32 in. to 4/32 in. When running within parameters, the welding arc on a hardband unit is only going to penetrate 2/32 in. to 3/32 in. from the OD. When inlays are misidentified and welded over, it is likely that the new hardband will not fuse to the tool joint steel, and can actually compromise the adhesion of the initial inlay, resulting in delamination of both bands.
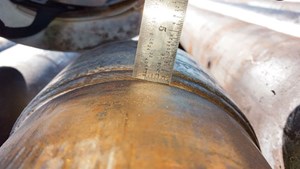
This same principle comes into play when determining whether or not it is time to reapply over a raised hardband. Raised hardbanding is generally applied 4/32 in. thick, so when worn to a height of 2/32 in., it still has half of its service life remaining. We do not recommend reapplication until the existing hardband has worn below 1/16 in., with 1/32 in. or less being optimal, Fig. 3. We have seen a great number of cases, where applicators are unnecessarily applying new hardbands over hardbands that have sustained next-to-no wear, driving up project costs for end-users.
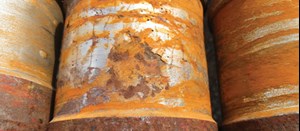
Another oft-overlooked issue is “heat checking” of hardbands. Embrittlement of tool joints while drilling, known as heat checking, is a downhole equipment life-limiting event that has been documented in the drilling industry since the 1940s. Heat checking is caused by cycles of rapid heating and quenching of the tool OD. Damage may occur at any time that friction-heating raises the surface temperature of the tool above steel’s critical threshold of 1,450°F. A tool joint rotated against casing with a 2,000-lb side load can produce temperatures of 1,900°F in as little as 2 min.1 When drilling fluid rapidly quenches the steel, the thermal shock will initiate a martensitic transformation that embrittles the OD of the tool joint and introduces a distinctive micro-crack pattern, Fig. 4.
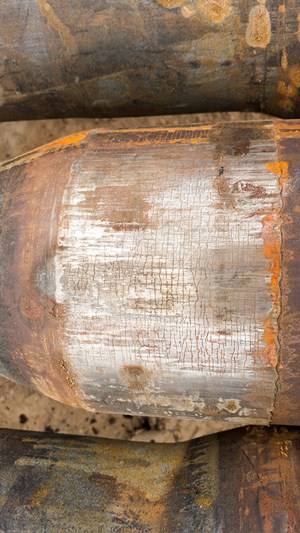
Neglect of this initial stage will result in macro-cracking, premature wear and, ultimately, tool joint failure. Raised hardbanding serves as a bearing surface between the sidewall and tool joint, protecting the parent material from friction heating. Inlaid-style hardbands do not provide equivalent protection from heat checking, as the entire OD is still load-bearing.
Frequently, both drill pipe inspectors and hardband applicators fail to notice or properly identify heat check damage. The traditional inspection criteria of only rejecting cracks that protrude outside of the hardband region, coupled with the extensive use of cracking-style hardband wires over the last two decades, has created an effective blind spot in the industry. Inspectors should receive comprehensive, hardband-specific training, to close this knowledge gap.
There also is an all-too-common misconception regarding the ability to repair heat checking through further hardband application. Heat checking, or any cracks for that matter, cannot be repaired reliably through welding, alone. Embrittlement from heat checking frequently extends to depths beyond ¼ in. from the tool joint OD.2 When this is considered against the 2/32-in.-to-3/32-in. penetration depth of a typical hardband, it becomes clear that simply reapplying hardbanding is not an acceptable remedy. When heat-checked hardbands are welded over, the heat input from the arc can cause existing cracks to propagate into the parent material. Though the surface of the weld may pass visual and NDT inspection, cases of under-bead cracking and porosity become apparent only as the hardband is worn away.
Therefore, application of a new layer of hardbanding can effectively mask the presence of heat checking while actually introducing damage to the parent metal. Repeated applications over heat-checked hardbands will result in transverse cracks, which act as stress risers and lead to twist-offs. This is why it is critical to identify, cull and repair these defects through an effective pre-weld inspection program.
Few problems are as immediately apparent during welding, and as likely to cause failure, as the mixing of incompatible
hardband materials.3 Wire manufacturers are legendarily tight-lipped about alloy composition, so the industry has largely been left to trial and error to determine what works. There are third parties, who will observe and report on compatibility testing, but competing wire manufacturers have never participated in a joint study. Generally then, non-cracking style wires should not be applied over cracking type wires, as this usually will cause cracking in the new bands. Application of a mild steel butter pass may mitigate some of this risk, but removal is preferable, as it ensures a clean start.
Casing-friendly wires should not be applied over tungsten carbide. While a limited number are capable of going over it without issue, welding over tungsten only masks it temporarily. As soon as the new hardband wears down, the tungsten will be right back to grinding casing. Rather than risk hardband failure or worse, when converting a string from tungsten to a casing-friendly wire, removal is the better option. If making a change between casing-friendly wires, consult the wire manufacturer but also pay close attention to what the applicator has to say.
PREHEATING AND SLOW-COOLING
Properly preheating drill pipe is critical to successful hardband application. Preheating prevents thermal shock to the base metal, increases weld adhesion, diffuses moisture and gasses from within the parent metal, and reduces the risk of stress relief cracking.4 Improper preheating will cause cracking and spalling of the hardband, and can lead to tool joint failure. As critical as preheating is, insufficient preheating is still one of the leading causes of unacceptable hardbands. Most cases are due to haste and negligence, however there is a learning curve where preheating is concerned.
The most common instrument for measuring preheat temperatures is an IR or laser pyrometer. On the upside, they are relatively cheap and easy to find. On the downside, most are not calibrated regularly and require special lens filters to read accurately on a shiny or reflective surface, such as a worn hardband that has been cleaned in preparation for reapplication. These filters are not available for common, off-the-shelf IR units. They generally are only utilized in drill pipe manufacturing plants, in conjunction with induction coil preheat units, and are very costly. The best practical method for measuring temperatures is utilizing a calibrated pyrometer with a surface-contact probe. Contact probes are also available for reliable measurement of ID temperatures.
There has been some debate over how much preheating is actually necessary. Not all alloys are the same, and manufacturer specifications for the particular wire should be adhered to. Regardless of the alloy being applied, achieving a “soak heat” through the entire thickness of the tool joint is critical and often overlooked. Directly after the welds are applied, the hardbanding alloy and the base metal go through metallurgic phase changes that require a slow reduction in temperature. If only a surface heating was achieved, the insufficiently heated material toward the ID will leach away heat from under the weld too rapidly, resulting in embrittlement of the base metal. This same principle is what makes water circulation for IPC protection contrary to the fundamentals of welding and metallurgy.
Following along these lines, slow cooling is also of paramount concern. Immediately after welding, prior to any grinding or clean-up, the tool joint should be wrapped with a thermal blanket or covered with an insulated cooling can. The common mistake, here, is with attempting to clean up the weld before slow cooling. The higher the temperature, the more critical the insulation, so any delay is advised against.
REMOVAL
When worn hardbanding is determined to be unsuitable for reapplication for any reason, removal and repair is usually the most economical option to return pipe to service. There are several methods for removal of hardbanding. Machining, mechanical grinding, plasma gouging and “washing” with cut wire are the most common. Machining is favored for low heat input and precision. However, it is slower than the alternatives and not widely available as a mobile service. Though once a commonly used method favored by mobile operators, cut wire gouging has fallen largely into disuse, due to high heat input and imprecision. This method involves adjusting the torch alignment to cause the welding puddle to “wash” off the pipe, taking the old hard metal with it.
To some degree, plasma gouging can be said to have evolved from cut wire washing; however, modern plasma removal techniques allow for considerably more control than cutting wire. Depending on the thickness or depth of removal required, plasma is often considered the most rapid method of removal; however, concerns over exceeding allowable interpass temperatures can slow production when multiple passes are required. The use of mechanical grinders has grown to such a degree that hardband equipment manufacturers have integrated stone grinders into their product offerings. Grinding units are available in shop or field configurations, can be outfitted with water cooling to eliminate heat input concerns, and provide a sufficient level of precision for the job at hand. Any of the described methods, performed correctly, should yield satisfactory results. The deciding factor for removal method, whether by a service provider or a customer, is always going to come down to situational economics.
The severity and type of damage will determine whether a “full” or “flush” removal is necessary. In cases of only minor defects, it is usually possible to simply remove the hardbanding to the OD of the tool joint, whereas severe cracking or porosity may require the removal of metal below the OD. In cases requiring full removal, the tool joint must be rebuilt to a flush state, using a build-up wire prior to reapplication of hardbanding. Rebuilding tool joints is a slow process that should include inspections at several critical steps along the way. Thus, the process may cost anywhere from three to ten times as much as simple hardband reapplication. However, even at ten times the cost of a normal application, this option is less than the cost of replacing tool joints. In many cases, it can be performed entirely on location, eliminating the cost and lost time of sending pipe to a shop. ![]()
REFERENCES
1. Eaton, L. F., “Tool joint heat checking while predrilling for auger TLP project,” SPE paper 25776-MS, Jan.1, 1993.
2. Altermann, J. A., and T. B. Smith, “Heat checking/quench cracking tool joints,” SPE paper 23846-MS, Jan. 1, 1992.
3. Koneti, S., and S. Gokhale, “Hardbanding compatibility test program to stem tool joint failures caused by re-application of incompatible hardbanding,” SPE paper 173067-MS, March 17, 2015.
4. Stout, R. D., “Weldability of steels,” Welding Research Council, 4th Edition, 1987.

- Subsea technology- Corrosion monitoring: From failure to success (February 2024)
- Applying ultra-deep LWD resistivity technology successfully in a SAGD operation (May 2019)
- Adoption of wireless intelligent completions advances (May 2019)
- Majors double down as takeaway crunch eases (April 2019)
- What’s new in well logging and formation evaluation (April 2019)
- Qualification of a 20,000-psi subsea BOP: A collaborative approach (February 2019)

